You will spend most of your time on the main screen. You will find the other screens are just a mouse click away. Once you set up your viewing locations you can operate the program with just a mouse. This is a design plan so you can work with gloves on your hands.
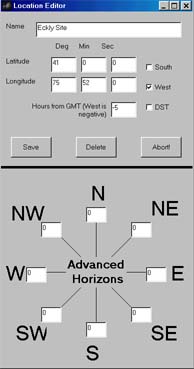
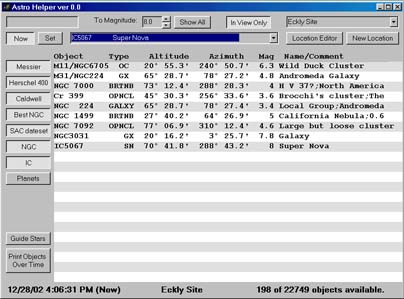
Starting in the upper left, you will find the controls for your location. You can choose a location, edit the location, or create a new location. When any of these actions are taken the program will recalculate what is visible and the location of the selected objects.
Moving to the left you will find the main object selection tool. You simply need to use the pull down list and click on the desired object. The object will then be placed on the list in the middle of the screen.
Immediately above the object selection tool you will find the limiting magnitude tool. With this tool you can instruct the program to only show objects that are brighter than the value indicated. You can change this value by clicking on the scroll arrows or simply typing a new value. If you want to see all objects no matter the magnitude, simply click the "View All" button. There are some objects that do not have assigned magnitudes, selecting this option is the only way to select them.
Next to the "View All" button is the "In View Only" button. This is selected when the program starts. When selected only objects above the horizon will appear in the object selection list. If you want to select objects that are below the horizon, simply press this button.
In the upper left corner are the time selection tools. When the program starts up it is running in "real time" mode. That means the locations are based on the computers clock. If you want to see what will be where at another time, simple click "Now" (this will deactivate "real-time" mode), type in the time in the field above, and click "Set". To return to "real-time" mode, click "Now".
Moving down the left side you can turn on and off selected object catalogs. When the program starts the Messier object catalog is selected. You can turn on additional catalogs by simply clicking their button. Currently the "Planets" button is not implemented.
Near the bottom of the screen on the left, you will find a "Guide Stars" button. This will display the brightest starts that are up, nut not so high that they would not be helpful in aligning the scope. These are to help you calibrate the telescope's azimuth .
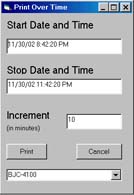
Finally there is a "Print Over Time" button. Click it if you want to generate a printout of objects' locations over a period of time.